Category: Roof

  • Poor Loft Ventilation Causing Condensation

    Poor Loft Ventilation Causing Condensation

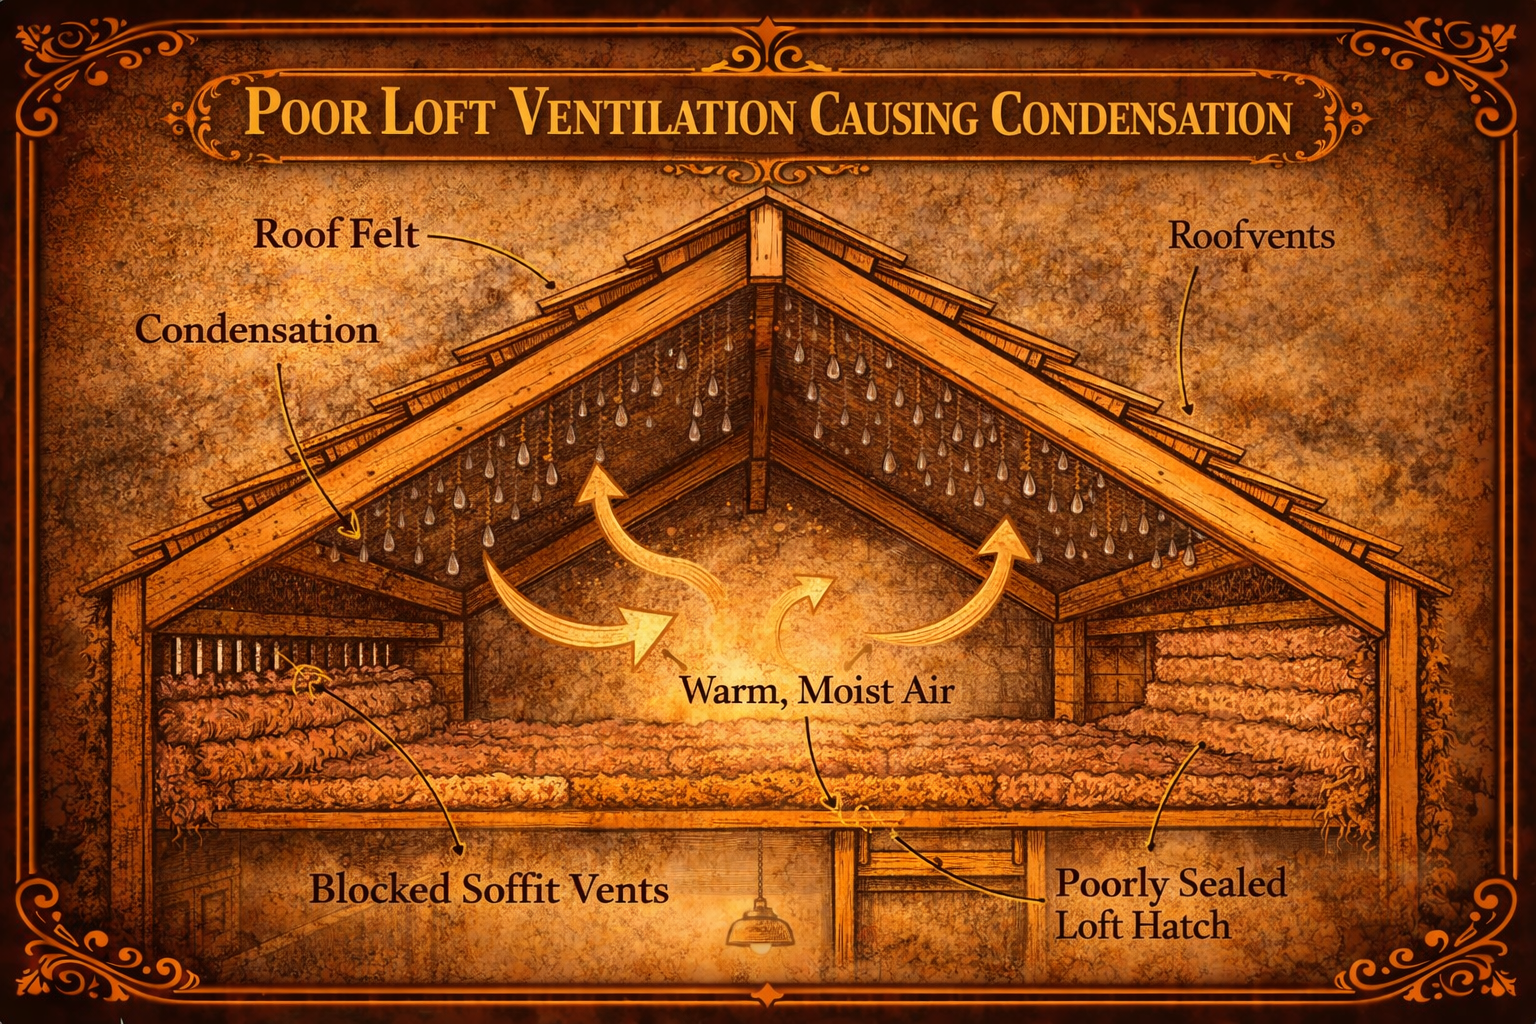
    Poor loft ventilation is one of the most common causes of condensation problems in homes, particularly during colder months. When warm, moist air from inside the house rises into the loft space but cannot escape properly, it condenses on cold surfaces such as roof felt, rafters, and timbers. Over time this moisture can lead to damp conditions, mould growth, and even timber decay if the issue is not addressed.

    Condensation occurs when warm air carrying moisture meets a cold surface. In most homes, moisture is constantly being produced through everyday activities such as cooking, showering, drying clothes indoors, and even breathing. This warm air naturally rises and can enter the loft through small gaps around loft hatches, ceiling lights, or poorly sealed ceiling penetrations. Without adequate ventilation to allow this moist air to escape, it becomes trapped in the loft space.

    Signs of poor loft ventilation often appear as water droplets on roof felt, damp insulation, or black mould forming on rafters and timbers. Homeowners may also notice a musty smell coming from the loft. In severe cases, condensation can drip onto insulation or ceilings below, sometimes being mistaken for a roof leak.

    Several factors can contribute to inadequate loft ventilation. Older homes may not have been designed with sufficient ventilation openings, while modern upgrades such as increased insulation can reduce natural airflow. Blocked soffit vents, missing air bricks, or poorly installed insulation that covers ventilation gaps can also prevent air from circulating properly.

    Improving ventilation is usually the most effective way to resolve condensation problems in lofts. This can often be achieved by installing or clearing soffit vents, roof vents, or ridge vents that allow fresh air to enter and moisture to escape. Ensuring insulation does not block airflow at the eaves is also essential, as this area is where much of the ventilation occurs.

    In addition to improving loft ventilation, reducing the amount of moisture entering the loft can also help. Ensuring extractor fans in bathrooms and kitchens vent properly outside, sealing gaps around loft hatches, and improving general home ventilation can significantly reduce moisture levels.

    If left untreated, persistent condensation can damage roof timbers and create conditions suitable for mould growth, which may affect indoor air quality. For this reason, identifying and addressing poor loft ventilation early is important to protect both the structure of the property and the health of occupants.

  • Solar Panel Installation Causing Roof Leaks

    Solar Panel Installation Causing Roof Leaks

    Solar panels are increasingly installed on UK homes as part of energy efficiency upgrades. While most installations are safe and effective, some homeowners experience roof leaks shortly after solar panels have been fitted.

    Leaks usually occur when the roof covering is disturbed during installation or when mounting brackets are not properly sealed. Because solar panels are fixed directly to the roof structure, even small installation errors can allow rainwater to enter the roof.

    Water entering through the roof can eventually lead to damp patches on ceilings, mould growth in loft spaces or damage to roof timbers.

    Why Solar Panel Installations Can Cause Roof Leaks

    Solar panels are typically attached to the roof using metal mounting brackets that are secured to the roof rafters beneath the tiles.

    During installation, roof tiles are lifted so the brackets can be fixed to the timber structure. If tiles are cracked, incorrectly replaced or poorly sealed during this process, water can penetrate beneath the roof covering.

    Common causes include:

    • cracked roof tiles caused by installers walking on them
    • poorly sealed mounting brackets
    • damaged roof felt or underlay
    • incorrectly positioned flashing around brackets
    • tiles that were not correctly reinstalled after fitting

    Leaks may not always appear immediately. In some cases the first signs of a problem appear months later during heavy rainfall.

    Warning Signs of Roof Leaks After Solar Installation

    Homeowners may notice several signs that water is entering the roof after solar panels have been installed.

    Typical warning signs include:

    Leaks often occur close to the location of mounting brackets or roof penetrations.

    How the Problem Is Diagnosed

    A roofing professional will usually inspect both the external roof covering and the loft space to identify where water is entering.

    Inspection may involve:

    • checking roof tiles around the solar panel brackets
    • examining flashing and sealing around mounting points
    • inspecting roof felt for tears or damage
    • tracing water marks along roof timbers

    In some cases solar panels may need to be temporarily lifted to fully inspect the roof structure beneath them.

    How Roof Leaks From Solar Panels Are Fixed

    The repair depends on the exact cause of the leak.

    Common repair solutions include:

    • replacing cracked or broken roof tiles
    • resealing mounting brackets
    • installing new flashing around bracket penetrations
    • repairing damaged roof felt or underlay

    Once the roof structure is properly sealed, the solar panels can usually be reinstalled without further issues.

  • Temporary Roof Leak Fixes: What You Can Do Until Proper Repairs Are Made

    Temporary Roof Leak Fixes: What You Can Do Until Proper Repairs Are Made

    Roof leaks can occur suddenly during heavy rain or storms. While permanent repairs are always necessary, temporary measures can sometimes reduce water damage until a professional repair can be completed.

    These temporary fixes are intended only to limit damage and should not replace proper roof repairs.

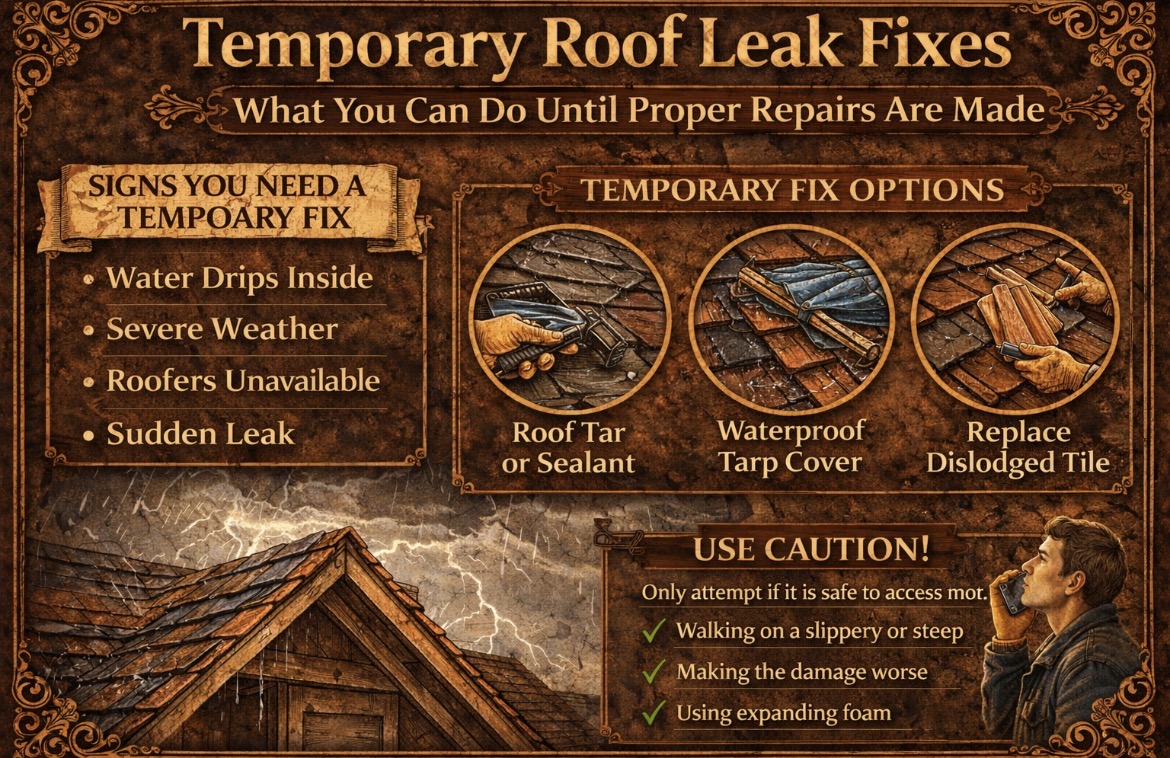
    Signs You Need a Temporary Roof Leak Fix

    Homeowners often need temporary measures when:

    • Water is actively dripping inside the house

    • A roofing contractor cannot attend immediately

    • Severe weather prevents safe repairs

    • The leak appears suddenly during storms

    Acting quickly can help protect ceilings, insulation and personal belongings.

    Quick Temporary Actions Inside the Home

    Use Buckets or Containers

    Placing buckets beneath dripping water prevents floors and furnishings from becoming soaked.

    Protect Furniture and Flooring

    Move furniture away from the leak and place plastic sheets or towels beneath dripping areas.

    Relieve Ceiling Water Pressure

    If water begins to bulge behind a ceiling, carefully puncturing a small hole may allow water to drain safely and prevent a larger collapse.

    Temporary Fixes from the Roof Exterior

    These methods should only be attempted if it is safe to access the roof.

    Roof Tar or Sealant

    Roofing sealant or tar can sometimes temporarily seal small cracks or holes around flashing or tiles.

    Waterproof Tarp Cover

    Covering the damaged section with a waterproof tarp secured with timber battens can provide short-term protection from rain.

    Replace Dislodged Tiles

    If a tile has slipped out of position, carefully repositioning it may temporarily reduce water entry.

    Temporary Fixes for Flashing Leaks

    Flashing leaks around chimneys or vents are common sources of roof leaks.

    Temporary solutions may include:

    • Applying roofing tape over small gaps

    • Sealing edges with waterproof roofing sealant

    • Covering the area with temporary flashing tape

    These methods should only be considered temporary.

    What Not to Do

    Some DIY attempts can make roof leaks worse.

    Avoid:

    • Walking on fragile roof areas

    • Using expanding foam on roofing materials

    • Ignoring the problem once temporary measures are in place

    Temporary repairs should always be followed by proper roof repairs.

    Why Permanent Repairs Are Essential

    Even small leaks can cause significant long-term damage.

    Persistent roof leaks can lead to:

    • Rotting roof timbers

    • Mould growth

    • Damaged insulation

    • Ceiling collapse

    Arranging professional repairs as soon as possible is always the safest option.

  • Roof Leak in Loft or Attic: Causes, Signs and How to Fix It

    Roof Leak in Loft or Attic: Causes, Signs and How to Fix It

    A roof leak often becomes visible first inside the loft or attic space before it appears on ceilings or walls below. Because the loft sits directly beneath the roof structure, it is usually the first place water enters when roofing materials fail.

    Identifying a leak early in the loft can prevent serious damage to insulation, timber structures and ceilings.

    Common Signs of a Roof Leak in the Loft

    Several warning signs may indicate water is entering your roof space.

    Water Drips or Damp Patches

    One of the most obvious signs is water dripping from the roof felt or rafters. You may also notice damp patches forming on insulation or timber beams.

    Wet or Compressed Insulation

    Roof leaks often soak insulation. Wet insulation may appear darker, flattened or clumped together.

    Staining on Rafters or Roof Felt

    Brown or dark stains on timber rafters or roofing felt usually indicate water has been entering for some time.

    Musty Smell

    Persistent moisture in a loft can cause mould growth and create a damp, musty smell.

    What Causes Roof Leaks in Loft Spaces?

    Most attic leaks are caused by damage or deterioration in the roofing system above.

    Broken or Missing Roof Tiles

    Cracked or displaced tiles allow rainwater to enter beneath the roof covering.

    Damaged Roof Felt

    Roofing felt acts as a secondary waterproof layer. If it tears or deteriorates, water can pass through into the loft.

    Faulty Flashing

    Flashing around chimneys, vents or roof valleys can fail over time, allowing water to enter.

    Blocked Gutters

    Overflowing gutters can push water under roof edges and into the roof structure.

    Condensation Problems

    Sometimes moisture in lofts is caused by poor ventilation rather than an actual roof leak.

    How to Locate the Source of a Loft Roof Leak

    Finding the exact entry point of a leak can be difficult because water often travels along rafters before dripping.

    Steps to investigate include:

    1. Inspect roof tiles directly above damp areas.
    2. Look for daylight showing through gaps in the roof.
    3. Check flashing around chimneys and vents.
    4. Examine roof felt for tears or holes.

    Leaks often appear several feet away from where water actually enters.

    Temporary Actions to Reduce Damage

    If water is actively entering the loft, temporary measures can help limit damage until repairs are carried out.

    You can:

    • Place buckets under dripping areas

    • Move stored items away from damp zones

    • Cover exposed areas with waterproof sheeting

    However, these should only be considered short-term solutions.

    Permanent Repairs

    Permanent repairs usually involve fixing the external roofing problem.

    Common repairs include:

    • Replacing broken roof tiles

    • Repairing flashing around roof penetrations

    • Installing new roof felt sections

    • Improving loft ventilation to reduce condensation

    In severe cases, sections of the roof may need to be replaced.

    When to Call a Professional

    If the leak is persistent, difficult to locate or causing structural damage, a roofing professional should inspect the roof.

    Early repairs are typically far cheaper than repairing water damage to ceilings, insulation and timber structures.

  • Roof Leak Around Dormer Window: Causes, Signs and Fixes (UK Guide)

    Roof Leak Around Dormer Window: Causes, Signs and Fixes (UK Guide)

    A roof leak around a dormer window is a relatively common issue in properties with loft conversions or attic bedrooms. Dormer windows extend vertically from a sloping roof and create several joints where different roofing materials meet. These junctions must be properly sealed to prevent water penetration.

    If flashing, seals or surrounding roof tiles become damaged, rainwater can enter the roof structure and appear as damp patches around the dormer window or on nearby ceilings and walls.

    Because dormers interrupt the natural flow of rainwater down a roof slope, they can be particularly vulnerable to leaks during heavy rain or strong winds.

    Common Causes of Roof Leaks Around Dormer Windows

    Several issues can lead to water penetration around dormer windows.

    Damaged Dormer Flashing

    Flashing is installed where the dormer meets the main roof to create a waterproof seal. Over time flashing can crack, loosen or corrode, allowing water to enter the roof.

    Poorly Installed Flashing

    If flashing was incorrectly installed when the dormer was constructed, gaps may allow water to seep underneath roof tiles and into the structure.

    Cracked or Slipped Roof Tiles

    Tiles surrounding the dormer can become cracked or dislodged due to weathering or storm damage. Even small gaps between tiles can allow rainwater to penetrate.

    Deteriorated Sealant

    Sealant around dormer window frames may deteriorate over time. When this happens, water can enter through small gaps around the window frame.

    Blocked Gutters Near Dormers

    Dormer windows often sit near roof valleys or gutter lines. Blocked gutters can cause water to back up and overflow near the dormer structure.

    Warning Signs of a Dormer Roof Leak

    Leaks around dormer windows often produce noticeable signs inside the property.

    Common warning signs include:

    • Damp patches near the dormer window
    • Water stains on ceilings or walls
    • Peeling paint or wallpaper around the dormer area
    • Dripping water during rainfall
    • Musty smells in loft spaces
    • Visible cracks in flashing or sealant

    If these signs appear, the dormer and surrounding roof area should be inspected.

    How to Fix a Roof Leak Around a Dormer Window

    Repairing the leak usually involves restoring the waterproof seal around the dormer.

    Replace or Repair Flashing

    Damaged flashing should be repaired or replaced to ensure water cannot enter around the dormer junction.

    Replace Broken Tiles

    Any cracked or displaced roof tiles surrounding the dormer should be replaced.

    Reseal Window Frames

    If water is entering around the dormer window frame, the sealant should be renewed to create a watertight seal.

    Check the Roof Structure

    If water has entered the loft space, insulation and timber rafters should be checked for signs of damp or decay.

    Preventing Dormer Roof Leaks

    Regular maintenance can help prevent leaks around dormer windows.

    Homeowners should consider:

    • Inspecting flashing around dormers annually
    • Replacing cracked roof tiles quickly
    • Ensuring gutters near dormers remain clear
    • Resealing window frames when necessary
    • Having the roof inspected after severe weather

    Proper maintenance helps keep dormer windows watertight and protects the roof structure from water damage.

  • Roof Leak Near Gutters: Causes, Signs and How to Fix It (UK Guide)

    Roof Leak Near Gutters: Causes, Signs and How to Fix It (UK Guide)

    A roof leak near gutters is a common problem in residential properties, particularly after periods of heavy rain. Gutters are designed to channel rainwater safely away from the roof and walls of a property. When they become blocked or damaged, water can overflow and penetrate the roof structure.

    Leaks around the gutter line can cause damp patches on ceilings, water staining on external walls and even structural damage if left unresolved.

    Understanding the causes of leaks near gutters can help homeowners identify problems early and prevent costly repairs.

    Common Causes of Roof Leaks Near Gutters

    Several issues around the roof edge can allow water to enter the building.

    Blocked Gutters

    Leaves, moss and debris often accumulate in gutters, especially during autumn. When gutters become blocked, rainwater can overflow and run back underneath roof tiles, allowing water to enter the roof structure.

    Damaged Fascia Boards

    Fascia boards support the guttering system and protect the roof edge. If these boards become rotten or damaged, water can seep into the roofline and cause leaks.

    Slipped or Broken Roof Tiles

    Roof tiles located near the gutter line can become cracked or slip out of place over time. Even small gaps between tiles can allow rainwater to penetrate the roof.

    Poorly Installed Gutters

    If gutters are incorrectly positioned or sloping the wrong way, water may pool instead of draining away. This increases the risk of leaks along the roof edge.

    Overflow During Heavy Rain

    During intense rainfall, blocked or undersized gutters may struggle to cope with the volume of water, leading to overflow and leaks near the roof edge.

    Warning Signs of a Roof Leak Near Gutters

    Leaks around the gutter area often produce visible warning signs.

    Common indicators include:

    • Water stains near the top of interior walls
    • Damp patches along ceilings near external walls
    • Water overflowing from gutters during rainfall
    • Rotting fascia boards or peeling paint around the roofline
    • Moss or debris visible inside gutters
    • Dripping water near the edge of the roof

    If these signs appear, the guttering system should be inspected promptly.

    How to Fix a Roof Leak Near Gutters

    Repairing the leak usually involves addressing the underlying problem with the guttering or roof edge.

    Clean the Gutters

    Removing leaves, moss and debris allows rainwater to flow freely through the gutter system.

    Repair or Replace Fascia Boards

    Rotten or damaged fascia boards should be replaced to restore protection around the roofline.

    Replace Damaged Tiles

    Any cracked or slipped tiles near the gutter line should be replaced to maintain the roof’s waterproof barrier.

    Adjust Gutter Alignment

    Ensuring gutters slope correctly toward the downpipe will help prevent water pooling and overflow.

    Preventing Roof Leaks Near Gutters

    Regular maintenance can prevent many gutter-related roof leaks.

    Homeowners should consider:

    • Cleaning gutters at least twice per year
    • Inspecting gutters after heavy storms
    • Installing gutter guards to reduce debris build-up
    • Checking fascia boards for signs of rot
    • Ensuring downpipes remain clear

    Proper maintenance of the guttering system helps protect the roof structure and prevents water damage to the property.

  • Roof Leak During Strong Winds: Causes, Signs and How to Fix It (UK Guide)

    Roof Leak During Strong Winds: Causes, Signs and How to Fix It (UK Guide)

    A roof leak that appears during strong winds is a common problem in many UK homes. High winds can lift roof tiles, loosen flashing and force rainwater beneath the roof covering. Once water enters the roof structure, it can travel along rafters and appear as damp patches or ceiling stains inside the property.

    Wind-driven rain can also push water into small gaps that would normally remain watertight during calm weather. Because of this, roof leaks during storms may only appear when strong winds occur.

    Identifying the cause of a wind-related roof leak quickly can prevent further damage to the roof structure and interior of the home.

    Common Causes of Roof Leaks During Strong Winds

    Several roofing defects can allow water to enter during windy conditions.

    Lifted or Loose Roof Tiles

    Strong winds can slightly lift roof tiles or slates, breaking the seal that normally protects the roof. When wind-driven rain hits the roof surface, water can be forced beneath the tiles and into the roof space.

    Missing or Damaged Ridge Tiles

    Ridge tiles run along the peak of the roof and are particularly exposed to wind. If the mortar holding them in place becomes loose or cracked, strong winds can allow rainwater to penetrate the roof.

    Damaged Flashing

    Flashing is installed around chimneys, skylights and roof joints to prevent water entering the building. Over time flashing can become loose or damaged, allowing water to seep inside when wind drives rain against the roof.

    Loose Roofing Materials

    Older roofs may develop small gaps as materials expand, contract and weather over time. Strong winds can worsen these gaps and allow rainwater to enter.

    Debris Impact

    Storm conditions can also cause branches or debris to strike the roof, damaging tiles or dislodging protective materials.

    Warning Signs of a Wind-Related Roof Leak

    Roof leaks caused by strong winds often appear suddenly during or shortly after a storm.

    Common warning signs include:

    • Water stains on ceilings or walls
    • Dripping water in the loft space
    • Damp patches appearing after storms
    • Missing or displaced roof tiles
    • Pieces of tile or mortar found on the ground
    • Musty smells in the attic

    If these signs appear after windy weather, the roof should be inspected as soon as possible.

    How to Fix a Roof Leak Caused by Wind

    The appropriate repair will depend on the source of the leak.

    Replace Damaged Tiles

    Any tiles that have cracked, slipped or been blown loose should be replaced to restore the roof’s waterproof layer.

    Repair Ridge Tiles

    Loose ridge tiles may need to be re-bedded with fresh mortar or secured with modern ridge fixing systems.

    Reseal Flashing

    Damaged flashing around chimneys, vents or roof windows should be repaired or replaced to prevent further water penetration.

    Inspect the Roof Structure

    If water has entered the loft space, insulation and timber supports should be inspected for signs of dampness or rot.

    Preventing Roof Leaks During Storms

    Regular roof maintenance can significantly reduce the risk of storm-related leaks.

    Homeowners should consider:

    • Inspecting the roof after severe weather
    • Replacing cracked or loose tiles promptly
    • Checking flashing around chimneys and skylights
    • Clearing gutters and roof valleys of debris
    • Having older roofs inspected by a professional roofer

    Taking preventative steps can help ensure the roof remains watertight even during strong winds and heavy rain.

  • Roof Leak in Winter: Causes, Signs and How to Fix It (UK Guide)

    Roof Leak in Winter: Causes, Signs and How to Fix It (UK Guide)

    A roof leak in winter is a common issue for homeowners, especially during periods of heavy rain, snow, frost and strong winds. Cold temperatures can worsen small roof defects and allow water to enter the roof structure, often causing damp patches, ceiling stains and insulation damage.

    Even a small winter leak should be investigated quickly, as ongoing water penetration can lead to timber rot, mould growth and costly structural repairs.

    Understanding the common causes of roof leaks in winter can help you identify the problem early and prevent further damage to your home.

    Common Causes of Roof Leaks in Winter

    Several roofing problems are more likely to appear or worsen during winter months.

    Damaged or Missing Roof Tiles

    Cold weather, frost and strong winds can loosen or crack roof tiles. Once a tile is damaged or displaced, rainwater can easily penetrate the roof covering and travel into the loft space.

    Ice and Frost Damage

    Repeated freezing and thawing can expand small cracks in roof materials. Over time this can weaken tiles, flashing and mortar, allowing water to enter the roof structure.

    Blocked Gutters

    Leaves, moss and debris often accumulate in gutters during autumn. When winter rain arrives, blocked gutters can cause water to overflow and seep beneath roof tiles or into wall cavities.

    Damaged Flashing

    Flashing around chimneys, roof valleys and skylights can deteriorate over time. Winter storms and temperature changes may worsen existing gaps or cracks, allowing water to enter.

    Condensation in the Loft

    Not all winter roof leaks are caused by rain. Poor ventilation in the loft can lead to heavy condensation forming on cold surfaces. This moisture can drip onto insulation or ceilings and appear similar to a roof leak.

    Warning Signs of a Winter Roof Leak

    Winter roof leaks are not always immediately visible, but there are several signs that may indicate a problem.

    Common warning signs include:

    • Water stains on ceilings or walls
    • Damp patches appearing after heavy rain
    • Dripping water in the loft space
    • Mould or musty smells in the attic
    • Dark patches or damp insulation
    • Missing or damaged roof tiles visible from outside

    If these signs appear during winter, it is important to inspect the roof as soon as possible.

    How to Fix a Roof Leak in Winter

    The correct repair will depend on the cause of the leak.

    Replace Damaged Tiles

    Broken or slipped tiles should be replaced promptly to restore the waterproof barrier of the roof.

    Repair Flashing

    Cracked or loose flashing around chimneys, skylights and roof junctions should be resealed or replaced.

    Clear Blocked Gutters

    Cleaning gutters and downpipes allows rainwater to drain properly and prevents water from backing up under roof tiles.

    Improve Loft Ventilation

    Installing roof vents or improving airflow in the loft can reduce condensation problems during cold weather.

    Temporary Repairs

    If the leak appears during severe weather, temporary solutions such as roofing sealant or waterproof tape may reduce water ingress until permanent repairs can be completed.

    Preventing Roof Leaks in Winter

    Regular roof maintenance can help prevent many winter leaks.

    Homeowners should consider:

    • Inspecting the roof before winter arrives
    • Clearing gutters and downpipes regularly
    • Checking flashing around chimneys and skylights
    • Replacing cracked or damaged tiles
    • Ensuring loft spaces are properly ventilated

    Preventative maintenance can significantly reduce the risk of winter roof leaks and protect the structure of the property.

  • Roof Valley Leak: Causes, Signs and Fixes (UK Guide)

    Roof Valley Leak: Causes, Signs and Fixes (UK Guide)

    A roof valley leak is a common roofing problem in many UK homes. Roof valleys are the channels where two roof slopes meet, allowing rainwater to flow safely down into the guttering system. Because valleys carry a large amount of water during rainfall, they are particularly vulnerable to damage, blockages and deterioration.

    When a roof valley begins to fail, water can enter beneath roof tiles or slates and eventually appear inside the property as damp patches, ceiling stains or dripping water during heavy rain.

    Understanding the causes of roof valley leaks can help homeowners identify problems early and prevent more serious structural damage.

    What Is a Roof Valley?

    A roof valley is the internal angle formed where two roof surfaces meet. This area is designed to direct rainwater quickly off the roof and into the gutters.

    Most roof valleys contain a waterproof lining made from materials such as:

    • Lead
    • Aluminium
    • Fibreglass
    • Valley trays beneath tiles

    Because valleys carry large volumes of water, they are one of the most critical waterproofing areas of any roof.

    Common Causes of Roof Valley Leaks

    Damaged valley lining

    Over time the material lining the valley can deteriorate due to weather exposure. Cracks or corrosion in the valley lining allow water to penetrate the roof structure.

    Debris build-up

    Leaves, moss and debris can accumulate in roof valleys. When this happens, rainwater may back up and flow underneath roof tiles instead of draining properly.

    Broken or slipped roof tiles

    Tiles along the edges of a valley can sometimes slip, crack or become dislodged. This exposes the valley lining and allows water to enter the roof.

    Poor installation

    If a roof valley has been poorly installed or incorrectly sealed, water may bypass the valley lining and penetrate beneath the roof covering.

    Age and general wear

    Older roofs are more prone to valley leaks because the materials naturally degrade over time.

    Warning Signs of a Roof Valley Leak

    Homeowners may notice several signs if a roof valley is leaking:

    Water entering through a valley can travel along roof timbers before appearing inside the property, so the visible leak may not be directly beneath the valley itself.

    How to Fix a Roof Valley Leak

    Clearing debris

    Removing leaves, moss and debris from the valley may restore proper water flow and prevent water from backing up.

    Replacing damaged tiles

    Broken or slipped tiles near the valley should be replaced to ensure the valley lining remains protected.

    Repairing the valley lining

    Small cracks or damage to the valley lining may be repaired using suitable roofing materials.

    Replacing the valley

    In more serious cases, the entire valley lining may need to be replaced. This usually involves removing surrounding roof tiles to install a new waterproof valley system.

    Preventing Roof Valley Leaks

    Regular roof inspections can help identify valley problems early. Clearing debris from roof valleys and gutters is one of the simplest ways to prevent leaks.

    Homeowners should also check their roofs after storms or strong winds, as these conditions can sometimes dislodge tiles near roof valleys.

    Conclusion

    Roof valleys play a critical role in directing rainwater safely off a roof. When valley linings become damaged, blocked or poorly installed, water can quickly penetrate the roof structure and cause damp or structural damage.

    Identifying the warning signs early and carrying out repairs promptly can help prevent more serious roofing problems.

  • Roof Leak Around Flashing: Causes, Signs and Fixes (UK Guide)

    Roof Leak Around Flashing: Causes, Signs and Fixes (UK Guide)

    A roof leak around flashing is a common cause of water entering a property. Flashing is designed to create a watertight seal where different parts of the roof meet, such as around chimneys, walls, skylights and valleys. When flashing becomes damaged, loose or poorly installed, rainwater can penetrate the roof structure and appear as damp patches, stains or drips inside the home.

    Because flashing is often hidden beneath roof tiles or slates, problems may develop slowly before becoming noticeable inside the property.

    What Is Roof Flashing?

    Roof flashing is usually made from metal such as lead, aluminium or steel. It is installed at vulnerable points on a roof to prevent water from entering gaps between building materials.

    Common locations where flashing is installed include:

    • Around chimneys
    • Where a roof meets a wall
    • Around skylights or roof windows
    • In roof valleys
    • Around roof vents and pipes

    Flashing works by directing rainwater away from joints and safely down the roof surface.

    Common Causes of Flashing Leaks

    Damaged or cracked flashing

    Over time flashing can crack, split or corrode due to weather exposure. Once the metal becomes damaged, water can seep underneath roof tiles and into the roof structure.

    Loose flashing

    Flashing can sometimes lift or become loose due to strong winds or poor installation. Even small gaps can allow rainwater to enter.

    Failed sealant

    Some flashing systems rely on sealant to maintain a watertight joint. Sealant can deteriorate over time, especially after years of exposure to sunlight and changing temperatures.

    Poor installation

    Incorrectly installed flashing is a frequent cause of roof leaks. If flashing is not properly integrated with roof tiles or slates, water may bypass the protective layer and enter the building.

    Movement in the roof structure

    Buildings naturally expand and contract with temperature changes. Over time this movement can loosen flashing joints or create gaps where water can penetrate.

    Warning Signs of a Flashing Leak

    Homeowners may notice several signs if flashing has started to fail:

    • Water stains on ceilings or walls
    • Damp patches near chimneys or roof junctions
    • Dripping during heavy rainfall
    • Mould or musty smells in the loft
    • Visible gaps or lifted metal flashing on the roof

    Leaks may not always appear directly below the damaged flashing because water can travel along rafters before becoming visible inside the property.

    How to Fix Roof Flashing Leaks

    Re-sealing flashing

    If flashing is still in good condition but the seal has failed, applying a suitable roofing sealant may resolve the issue.

    Re-securing loose flashing

    Loose flashing can sometimes be repaired by re-fixing it securely and ensuring it overlaps correctly with surrounding roof materials.

    Replacing damaged flashing

    If flashing is cracked or severely corroded, replacement may be required. This usually involves removing surrounding tiles or slates to install new flashing.

    Professional roof repair

    Because flashing repairs often involve working at height and disturbing roof materials, many homeowners choose to have the repair carried out by a qualified roofing professional.

    Preventing Flashing Problems

    Regular roof inspections can help identify flashing issues before they lead to serious leaks. Homeowners should check their roof after storms or periods of strong wind to ensure flashing remains secure.

    Keeping gutters clear and maintaining roof coverings can also help reduce the risk of water penetration.

    Conclusion

    Roof leaks around flashing are often caused by damaged metal, failed sealants or poor installation. Although the problem may start small, water entering through flashing joints can eventually lead to damp, mould and structural damage if left untreated.

    Identifying the signs early and repairing flashing defects promptly can help prevent more serious roofing problems.